If you have bought a domain already then go to the next steps. If you haven’t bought
a new domain we will guide you step-by-step on how to buy a new domain from
Namecheap web hosting.
Login to your domain hosting account(cPanel) where your domain is hosted. Find DNS Settings or DNS Zone File icon.
Click “MANAGE” button to add t
he CNAME Records. Click “+ ADD RECORD” to add CNAME Records one by one.
Here we have shown how to add CNAME Records in Namecheap’s DNS Hosting.
1.Go to Namecheap website and Sign-In to your account
2.Click “Domain List”.Click
3.the “Manage” button OR home icon under the Products label.
Now go to your domain’s DNS Settings and add this 4 A Records one by one:
@ 3600 In A 216.239.32.21
@ 3600 In A 216.239.34.21
@ 3600 In A 216.239.36.21
@ 3600 In A 216.239.38.21
For your understanding: “@” means root site. It is HOST. @ points to your website. “3600” is the TTL for each record.
TTL stands for Time-To-Live. 3600 means 60 minutes. There are 4 Google IP addresses which are called VALUE. On Namecheap account you have to add 4 A Records in the same location where you had added 2 CNAME records. This time you have to choose “A Record” instead of “CNAME” record. Go to Namecheap website and Sign-In to your account. Go to your “Domain List” section. Click the “Manage” button OR home icon under the Products label.
set up a domain for your Blogger website without having to type "www", you can follow these steps
- Purchase a domain: First, you need to purchase a custom domain from a domain registrar, such as GoDaddy, Namecheap, or Google Domains.
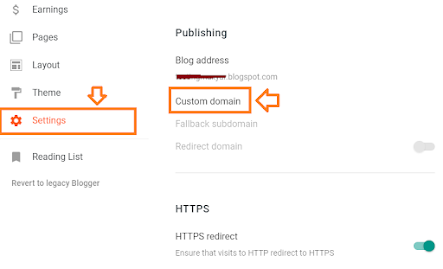
Add the custom domain to your Blogger account: Sign in to your Blogger account and go to the "Settings" section. Then, click on the "Basic" tab and scroll down to the "Publishing" section. Click on the "Add a custom domain" button and enter the custom domain you purchased in step 1.
Create a CNAME record: In the domain registrar's control panel, create a CNAME record that points to ghs.google.com. This is what tells your domain registrar to redirect traffic from your domain to your Blogger website. The exact steps to create a CNAME record will vary depending on the domain registrar you are using.
Verify the custom domain: Back in the Blogger settings, click the "Save" button and follow the verification instructions provided by Blogger. This may involve adding a TXT record or a meta tag to your domain registrar's control panel.
- Update your redirect settings: After the custom domain is verified, go to the Blogger settings and select the "Redirect" option. Then, check the box next to "Redirect yourdomain.com to www.yourdomain.com" and save your changes.
This should allow you to access your Blogger website using the custom domain without having to type "www". However, it's important to note that some browsers may still automatically add the "www" when entering the URL, so it's a good idea to test your domain from different browsers to make sure it works as expected.


0 Comments